Week 1: Drawing Shapes, Lines, Forms, Proportions, Silhouettes, Contouring
The amount of beginner guides out there for drawing almost seems endless. I feel like I must have looked at hundreds before putting this together.
Although many of them claimed they were for “beginners,” they actually were for varying levels of beginners.
Can’t draw a straight line to save your life? No worries! You are not a lost cause by any means.
But you are going to have to dedicate more time practicing to be on the level of “beginner” that most of these resources assume.
This article features a tutorial that offers a brand new perspective on the basics of drawing that I highly recommend.
I’ve provided the best sources I found to help you learn the very basics of drawing. This first week includes shapes and lines, guidelines and proportions, and an introduction to contouring.

DAY 1: PENCIL TECHNIQUES
Some artists grip their pencils differently than how we were taught to hold a pencil for writing in elementary school. It’s not a required method by any means.
You can use a pencil, however, the heck you want to. However, changing the grip on your pencil may allow you to produce a variety of effects and give you better control of your finished product.
Check out The Virtual Instructor’s article or Proko’s video demonstration on how to hold and control your pencil.
Exercise
It’s a simple one to start. Follow the resources above to explore the different ways to grip a pencil and what results come out of it.
DAY 2: DRAWING TWO-DIMENSIONAL SHAPES
It’s also important for you to have a good grasp of your basic shapes. Yes, we’ll have to take it back to preschool just for a second here. Bill Martin’s Guide to Drawing has some great information on shapes that I highly recommend.

You can use these shapes to help you draft the outline of an object to start. Want to draw a tennis racket? Start off with a rough sketch of an oval and a long, thin rectangle! Want to draw a dog? Start off with an oval head and rectangles for his body and legs.
Most people have trouble with the shapes that have all equal sides –circles, stars, squares, etc. Drawing a perfect freehand circle is almost nearly impossible but with practice, you can actually produce great results.
Need videos to help you draw some shapes? Here’s some great ones I found that don’t utilize extra tools (like rulers or protractors).
Freehand Circles: Dave Hax – How to Draw a Perfect Circle
Five-Pointed Stars: MyHowToDraw – How to Draw a Star
Squares: The Design Sketchbook – How to Draw Perfect Squares or visit the online guide
Exercise
We’re starting out easy again! Don’t worry, this exercise do get harder very quickly.
Practice drawing your circles, your squares, triangles, etc. Really get to know the parallel lines, the perpendicular lines and the angles that come with each one. Use a ruler if you need to, but once your shapes look like the shape they are supposed to be…start drawing them freehand.
Still look weird? Keep drawing! You’ll be able to see why that shape came out odd and you can try to correct it in your next attempt.
You’ll start to train your hand and eyes to feel more natural at drawing these shapes.
DAY 3: DRAWING GUIDELINES & PROPORTIONS
Guidelines can be useful to help you get the proportions right on a drawing subject. It could also help you make less mistakes (so less erasing) and allows you to focus on drawing one part of the subject at a time.
Guidelines could mean simply drawing a box to frame your subject (we’ll get more into composition later) or drawing shapes to get a better feel for the object (we’ll see examples of this in figure drawing).
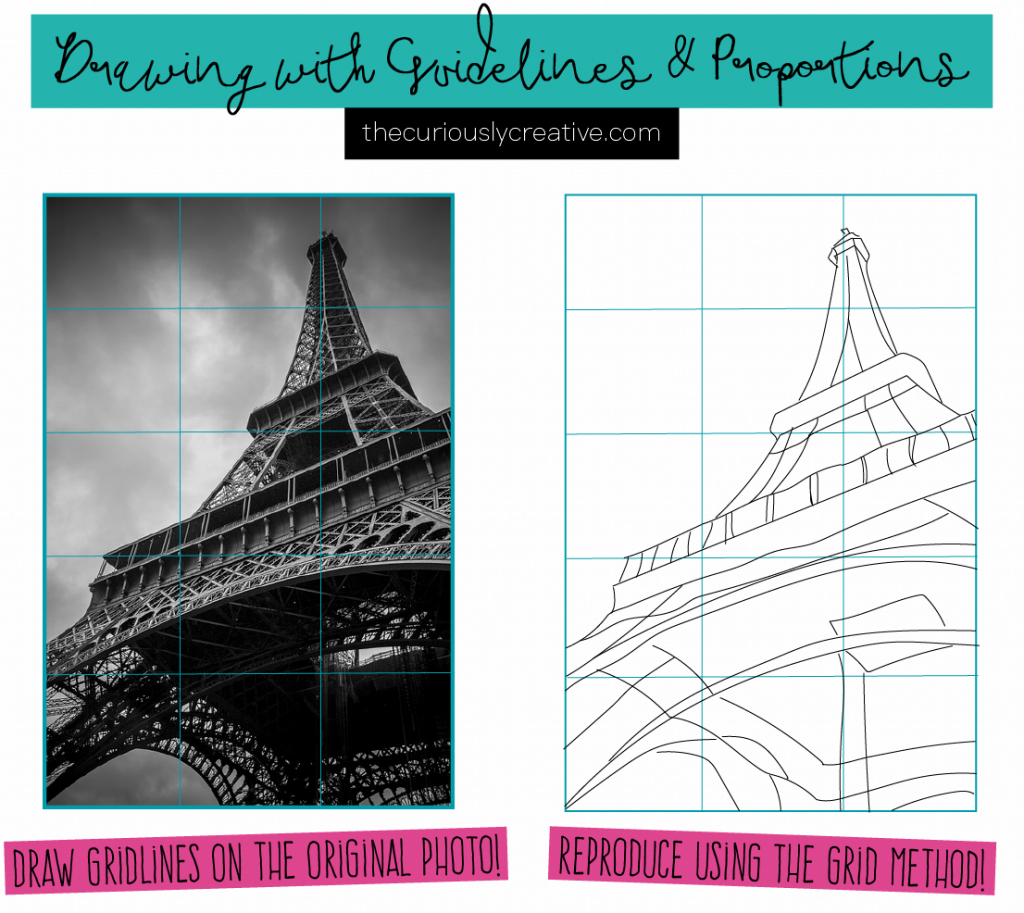
It could even mean using the grid method when you are trying to draw from a reference photo.
Thaneeya at Art-is-Fun.com has a detailed tutorial on how to use the grid method if you’d like to learn more.
Exercise
Find a small- or medium-sized photo in a magazine or newspaper you have lying around your house.
Draw grid lines using a ruler (like in the tutorial linked above). On a new sheet of paper, create your gridlines again at the same size of the ones you drew on the photo.
Using the grid method, reproduce the image onto your paper. No need to worry about details. Just simple outlines will do for this exercise!

Find another small-sized photo and draw gridlines on it again. This time, on a new sheet of paper, recreate your gridlines in a larger size.
For example, if you had 1/2 inch squares on your original photo, draw your new grid with 1 inch squares on the new paper.
Follow the grid method to reproduce your image. You’ll find that you will be able to keep the proportions but your image will be larger!
DAY 4: DRAWING THREE-DIMENSIONAL SHAPES
Just as important as it was to get a good grasp on two-dimensional shapes, it’s just as important to know your three-dimensional ones.
These will be a bit more difficult as they require an understanding of three-dimensional space as well.
The big ones you’ll have to tackle here are cubes, spheres, cylinders, and pyramids. Here are some resources I recommend based on your preference.
Artist Daily: Drawing Basics Guide – This guide covers spheres, cylinders and cubes and is a bit more technical and comprehensive than I would personally use.
However, it’s available as PDF and has a magazine-like feel to it so if you like printing things out to read or saving it as guidance later, it might be your style.
Bill Martin – In his three-dimensional shapes section, he covers spheres, cones, cylinders, tori (like a donut) and the cube. Not a step-by-step guide, but offers great textual tips on perfecting your technique with these shapes.
HowToDraw – How to Draw’s website has a step-by-step guide on how to draw a 3D cube. It covers shading, lighting and casts shadows –a few things we haven’t covered yet– but still easy to follow along.
The Virtual Instructor – In this video, you’ll see how to turn shapes into its three-dimensional form. It includes how to draw a sphere, cube, pyramid, and cylinder cone. A great video if you prefer to learn that way.
Exercise
I think you can guess what today’s exercise will be. Draw different three-dimensional shapes until you are comfortable with it. Draw a cube, cylinder, pyramid, and a cylinder cone. Create these shapes in varying sizes!

DAY 5: DRAWING SILHOUETTES
Silhouettes are an image of a particular subject as a solid shape in which the outline of the subject really is the focus here. Silhouettes in art actually go back pretty far, becoming quite popular in the mid-18th century.
I really think that practicing this skill is really helpful for beginners. It allows you to focus on the outline of the subject to help you determine what attributes of the object are important to portray in your drawing.
Like Bill Martin mentioned in his guide, the object’s silhouette is the first thing you see. The better your outline is of a particular object, the better your finished drawing will be when you add all the other details.
Exercise
Practice silhouettes. Don’t focus on what you think or remember the object to look like. Focus on what you see.

Wherever you are at with whatever drawing instruments you have now. Draw the objects around you. Y
our water bottle. The flower vase. The car keys. Whatever. Sometimes, the angle you initially use might not be the best one to really portray the object as a silhouette.
Try other views – like looking at the object from above or the side.
DAY 6: BLIND CONTOURING
We’re actually going to briefly cover three types of contouring here: blind contouring, modified contouring, and cross contouring.
BLIND CONTOURING
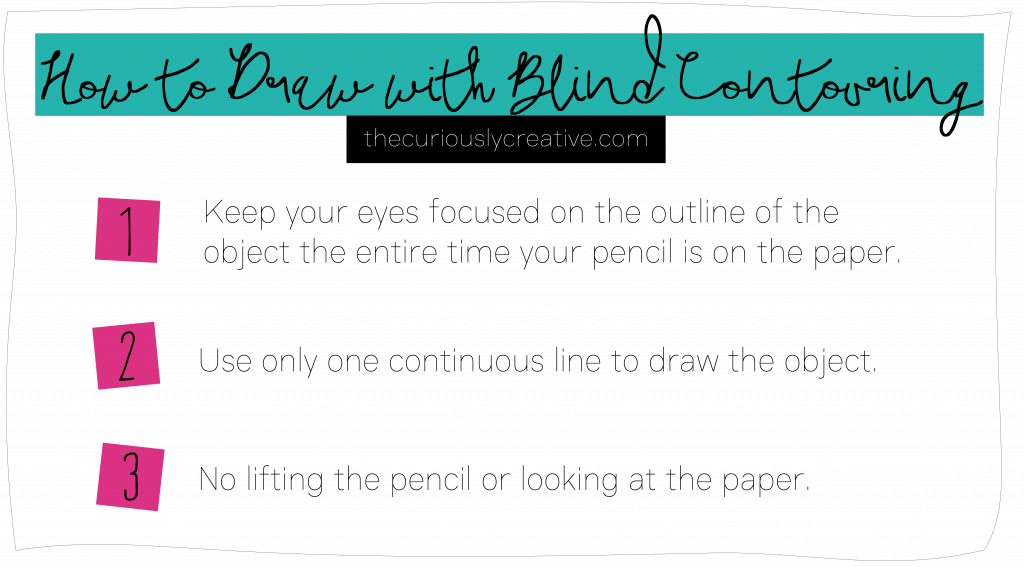
Blind contouring is a drawing exercise that many artists utilize to train the eye to draw what it sees instead of what it believes it sees. To me, it’s sort of the next step up to practicing silhouettes. You basically draw the subject without looking at the paper.

Yes, your drawing will probably be ugly. This may seem silly or a wasteful exercise but like drawing silhouettes, you are really focusing on object and drawing from your brain.
Here’s a great video demonstration from of blind contouring from Laurie Mann to help you visualize this exercise.
If you have trouble putting pencil to paper when first starting, begin with a blind contouring exercise.
You aren’t expected to create anything great from these so it helps by subconsciously lowering your expectations for sketching. You won’t feel like everything you draw needs to be perfect.
It allows your creative mind to be more freeing while also exercising your drawing skills by using both senses of sight and touch. A perfect combo!
Ian Sklarksy is a blind contour artist who has actually been quite successful at turning this typical drawing exercise into an art. Check him out to get some inspiration!
Modified Blind Contouring
You can also practice modified blind contouring where you still use one continuous line, but you can look at the paper to make sure that your pencil isn’t completely wandering off the paper.
Make sure you are still spending almost 90% of the time looking at the object.
The more you practice this, the less your paper will wander off and the more in tune you will become to the object and your drawing space.
Cross Contouring
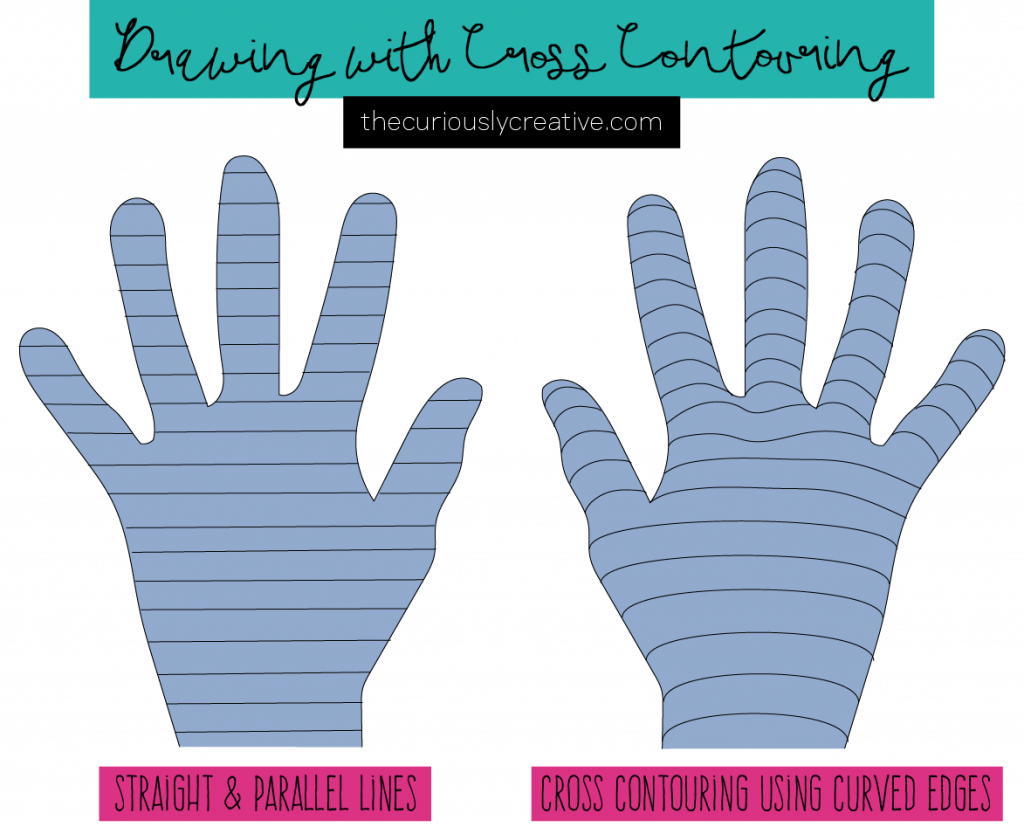
Contouring an object helps add more dimension and shape. You use parallel lines across the surface of the object. This is better explained in a picture.

See the hand on the left? The lines are very straight and parallel to each other. Now look at the one on the right?
The edges of the line are curved towards the edges of the hand outline. The lines on the right hand are still relatively parallel to one another but not straight.
This gives the right hand way more dimension while the left hand still looks flat.
Exercise
Start off by blind contouring your hand. After that, do modified blind contouring of your hand.
Lastly, trace your hand on a piece of paper and practice cross contouring. Repeat those 3 techniques with other objects, such as a water glass or a vase.
DAY 7: PRACTICE!
Practice makes perfect! Use this day to spend time on anything you feel you need more time practicing.
You’ve reached the end of week 1! LET’S GO TO WEEK 2!
OTHER GUIDES
The Complete Beginner’s Guide to Drawing
The Quick Beginner’s Guide to Drawing Supplies
Week 2: The Beginner’s Guide to Drawing Basics: Part 2
Week 3: The Beginner’s Guide to Perspective Drawing
Week 4: The Beginner’s Guide to Figure Drawing


