Now that we have a week of basics out of the way, we can move on to…yes, more basics. Drawing is a huge subject, you know!
This week was a bit difficult to break up into individual days because these concepts are important to understand together. You can also do week two’s learning schedule in one sitting, especially since there won’t be an exercise assigned for each day.

DAY 1: DRAWING TECHNIQUES
Different drawing techniques can help create a drawing’s tone (light and shadows).
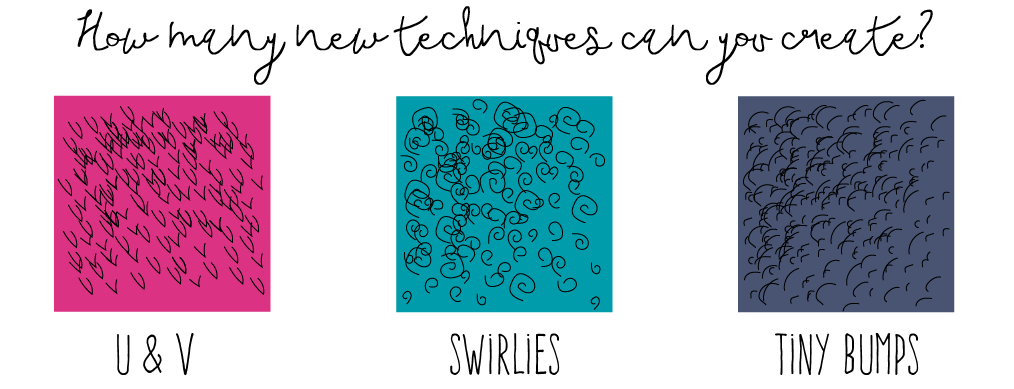
These techniques can include small dashes, hatching, cross-hatching, stippling (dots), scribbles, small crosses, and small circles. Each technique also has its own variations. You can always create your own techniques as well!
Check out a quick guide from HowToDraw.com or watch a video from The Virtual Instructor.
Exercise
Besides the drawing techniques listed here, try creating 3 of your own techniques to create tone for a drawing. Here’s an example of a few I created myself!
DAY 2: DRAWING VALUE
Besides outlines and contours, light and shadows can also help define an object. Especially in more realistic drawings.
Value (the different shades of gray between white and black) can be used to assist in the depiction of an object.
Bill Martin has a great section on Value and the Illusion of Form. If you would like a more visual way to learn value, this quick 6-minute video is also a great resource.

Exercise
Make a value scale using 5 values. Draw 5 squares next to each other. Shade in the first square until the value is black.
In the next square, shade it so that the value is slightly lighter than the first. Repeat for squares 3 and 4. Leave the last square white.
Your 3rd box is your mid-tone. Your last box will act as the highlight value. Incorporating just these 5 values can already make your drawings look more realistic.
Of course, there is a large range of grays between black and white. Not just 5. As you become more skilled, you can utilize more value in your drawing.
DAY 3: DRAWING SHADOWS
To really understand value, you also need to understand the relationship of your light source to your object and the shadows it casts.
However, there’s really more than one “shadow” we’re working with here. Drawing for Dummies has a nice guide that I will summarize briefly below.
Light source
You’ll have to identify in your drawing where the dominant light is coming from as it will pretty much determine all of the values in your drawing.
Shadows
This is the area on the object that receives little or no light.
Cast shadows
The ark area on the adjacent surface where the light is blocked by the solid object.
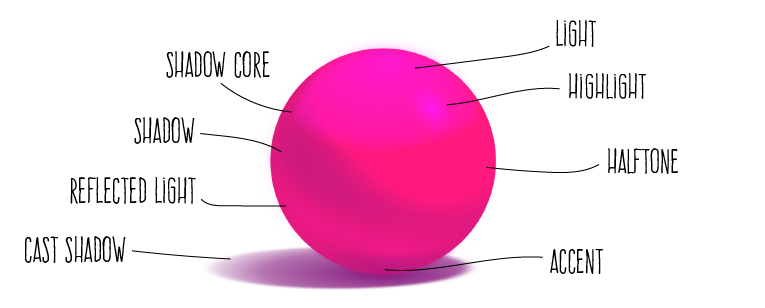
This image above can help you identify the important details of how a light shining from the upper righthand side would hit a sphere.
Notice the different shades it creates on this sphere. Proko has a good video on this as well.
Art of Wei has a nice video on drawing a sphere but if you prefer a step-by-step guide, Udemy provides a short one on just drawing a sphere without the cast shadow.
Exercise
Spheres. We didn’t cover them while going over three-dimensional shapes because a sphere isn’t a sphere until you apply multiple values to create tone.
If not, it’ll just be a circle. Practice drawing spheres. Try changing the position of the light source.
DAY 4: DRAWING CONTRAST
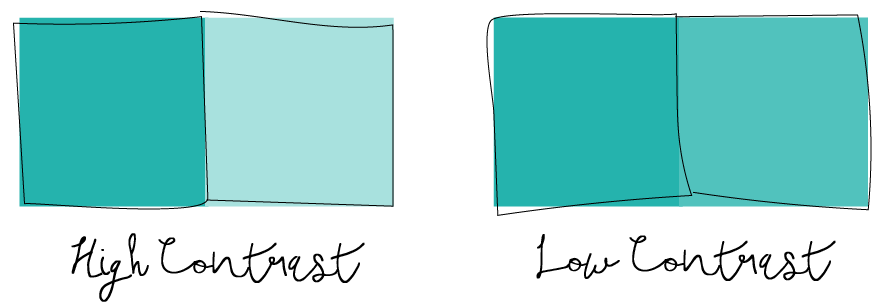
Contrast brings out the light and shadows and makes your drawings appear more realistic.
Contrast, as Bill Martin describes it, is the relationship between light and dark values.
Understanding contrast will help give you depth to a picture. Proko also has a short video on contrast as well.
Low contrast drawings will generally be completed using mostly light and middle values whereas high contrast drawings would have mainly darker values.
Shadows and cast shadows in the distance will typically be lighter and less defined whereas shadows closest to you will typically be darker and crisper.
Exercise
Bill Martin has a great exercise for the concept of contrast. I’m going to recommend you to his exercise for this one.
DAY 5: DRAWING TEXTURE
Not everything is made of the same material so learning how to portray different textures can be an important part of drawing.
There are tons of tutorials out there on drawing different textures so if there is a particular texture you want to try drawing, a specified Google or YouTube search will get you good results.
Regardless of the type of texture you want to depict, a few tips can help you create more realistic surfaces.
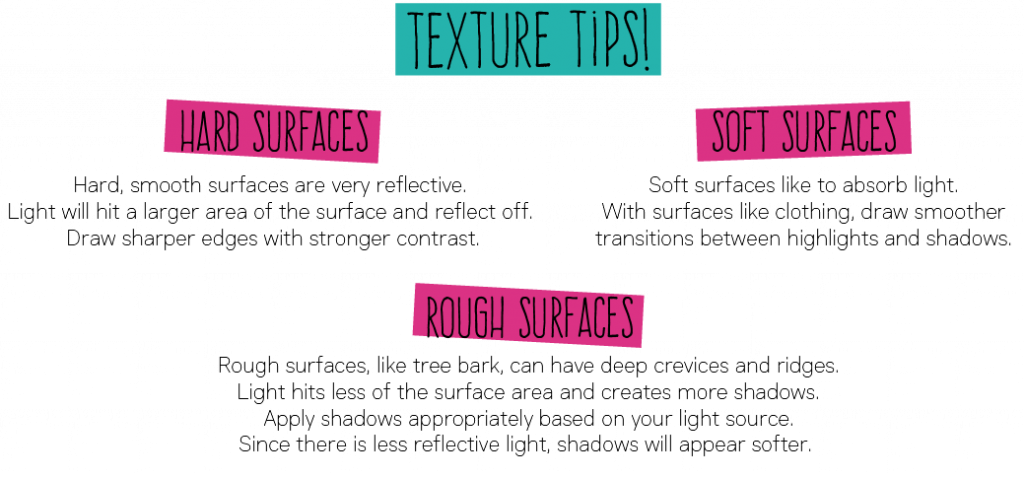
Here are a few resources I found to be extremely valuable in learning how to draw texture:
Alphonso Dunn: Alphonso has a 3-part video of a wide variety of textures including fur, wood, scales, carpet, hair, rocks, stones, tiles…the list goes on!
Pencils.com: In addition to the quick tips I referenced to above, this guide also has additional tips on drawing the texture of clouds/skies, grass, water, trees, and weathered wood.
We’ll get more into drawing different types of fabric in week 4 so don’t worry about those textures for now.
Exercise
Select 3 different surfaces that surround you right now. Maybe your table, the carpet or the ceiling tiles.
Draw these 3 the best you can keeping mindful of how the light hits the surface. If you are in a snag, try doing a specific search on a video or online guide to help you.
DAY 6: DRAWING REFLECTIONS
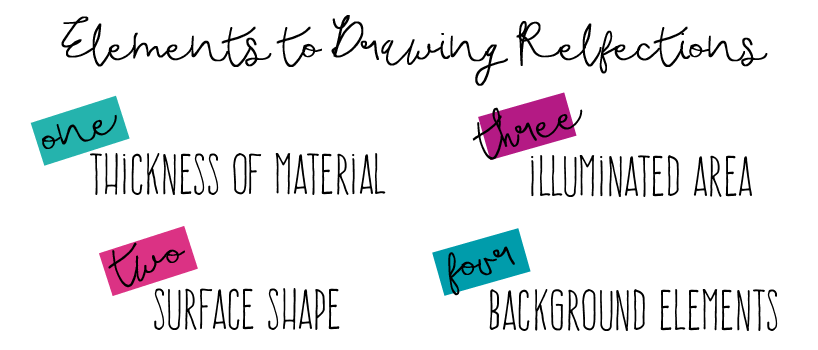
Once you start getting into different textures, you can also explore reflections. There are four things you really need to focus on when drawing reflections.
Bill Martin again has a great guide on reflections that cover mirrors, reflected surfaces and windows. This blog also has an illustrated step-by-step guide on creating reflective surfaces on glass.
Exercise
Place an object on a highly reflected surface such as a polished tabletop or glass.
Pick an object that is preferably easy to draw or can be drawn at your skill level.
Observe the reflections that are created on the surface by the object. Note the highlights and shadows and apply different values to your drawing to properly depict them.
DAY 7: DRAWING TRANSPARENCY
If you haven’t guessed, I really find value in Bill Martin’s Drawing Guide. He has some of the best tips and guides on the basics of drawing.
They aren’t step-by-step guides but he really provides some of the best insight to understanding how to draw these different basic drawing skills rather than just show you.
His section on Transparency is really the best I’ve found online. Make sure you click on the additional subpages for his Transparency section.
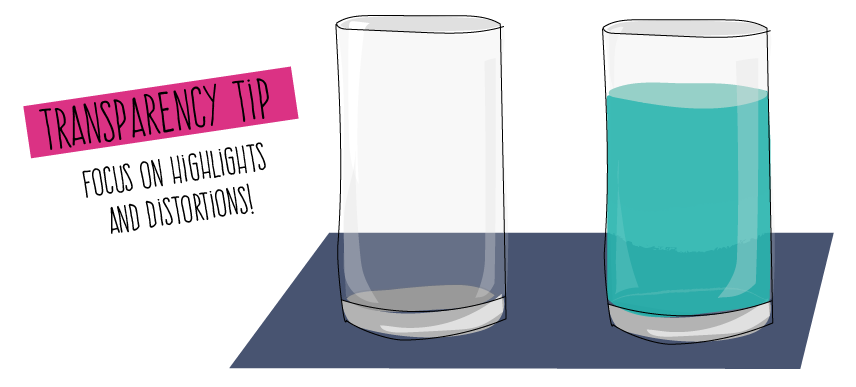
Having a good grasp on shadow, light and value is really important if you want to portray transparency in your art work.
“…both hollow and solid transparent objects have a primary highlight, and a secondary highlight opposite it. The difference is, on a solid transparent object the secondary highlight appears within the object, while on a hollow transparent object the secondary highlight is seen only in the object’s walls.” –Bill Martin
I haven’t been able to find a good beginner’s video on transparency. Many of them are time-lapse un-narrated videos.
However, Mark Crilley has a 25-minute narrated, step-by-step video on drawing glass that focuses more on the principles.
It’s a little more advanced if you are just starting out but you can take a quick look if you feel you might be up to the challenge.
Exercise
Find two of the same drinking glasses and place them in front of you. Pour water halfway into one of the glasses. Try drawing both of these and really take notice of the areas where the two glasses appear different from each other.
BONUS EXERCISE
This week’s drawing elements are all very fluid to each other. The best way I’ve found to practice these drawing elements is to draw different three-dimensional shapes utilizing a different skill learned in each one.
This exercise will help you practice your three-dimensional shapes, textures, values (with light and shadow) by using different drawing techniques (like cross-hatching, stippling, etc).
Sphere – Apply value with hatching with a light source shining on the top right-hand corner.
Cube – Apply value with cross-hatching with a light source shining on the top left-hand corner.
Cylinder – Apply value with stippling with a light source shining from the right side.
Pyramid– Apply value with scribbling with a light source shining from the left side.
Well, that wraps it up for week 2. Next week, we’ll be diving into perspective drawing!
OTHER GUIDES:
The Complete Beginner’s Guide to Drawing
The Quick Beginner’s Guide to Drawing Supplies
Week 1: The Beginner’s Guide to Drawing Basics: Part 1
Week 3: The Beginner’s Guide to Perspective Drawing
Week 4: The Beginner’s Guide to Figure Drawing

