Diamond painting has captivated crafters worldwide with its mesmerizing blend of artistry and relaxation. This hobby transforms intricate patterns into dazzling masterpieces using tiny, sparkling resin diamonds. Perfecting your diamond painting technique involves mastering precise placement, efficient organization, and meticulous attention to detail.
Achieving flawless results in diamond painting requires more than just following a pattern. It’s about creating a harmonious workspace, selecting the right tools, and developing a steady hand. From novices to experienced artists, everyone can benefit from refining their approach to this captivating craft.
As you embark on your diamond painting journey, consider exploring high-quality diamond art kits for adults to ensure the best possible outcome. With the right techniques and materials, you’ll be well on your way to creating stunning works of art that shine with precision and beauty.
Key Takeaways
- Create an organized workspace for optimal diamond placement
- Master precise techniques for applying diamonds efficiently
- Choose quality materials and tools for the best results
Setting Up Your Diamond Painting Workspace
A well-organized workspace enhances your diamond painting experience and leads to better results. Proper lighting, canvas preparation, and tool organization are essential for creating stunning designs.
Choosing the Right Lighting
Good lighting is crucial for diamond painting accuracy. Natural light is ideal, but not always available. Position your workspace near a window if possible. For artificial lighting, use a daylight lamp or LED task light. These provide bright, even illumination without causing eye strain.
Consider using a light pad for intricate designs. It illuminates the canvas from underneath, making symbols easier to see. This is especially helpful for darker canvases or smaller drills.
Adjust your lighting setup based on the time of day and your project’s needs. Experiment with different light sources to find what works best for your eyes and skill level.
Preparing Your Diamond Painting Canvas
Start by selecting an appropriate canvas size for your skill level and available space. Larger canvases offer more detail but take longer to complete. Beginners may prefer smaller projects.
Before starting, carefully remove the protective film covering the adhesive surface. Work in sections to prevent the exposed area from collecting dust or drying out. Some artists prefer to remove the entire film at once, while others uncover it gradually.
Flatten your canvas by placing heavy books on it for 24-48 hours. This prevents curling and ensures a smooth working surface. Use tape or clips to secure the canvas to a firm backing board for added stability.
Organizing Diamond Painting Tools and Accessories
Efficient tool organization is key to a smooth diamond painting process. Invest in quality tools that feel comfortable in your hand. Essential items include:
- Diamond applicator tool (pen or tweezers)
- Wax pad or boat
- Sorting trays
- Storage containers for drills
Create a dedicated storage system for your diamond drills. Clear plastic containers with multiple compartments work well. Label each compartment with the corresponding DMC color code for easy identification.
Keep your workspace tidy with small bowls or trays to hold drills while working. A rolling cart can be useful for storing supplies and moving your project around easily.
Mastering Diamond Painting Techniques and Tips
Diamond painting requires skill and precision to achieve stunning results. These techniques and tips will help you perfect your craft and create flawless artwork.
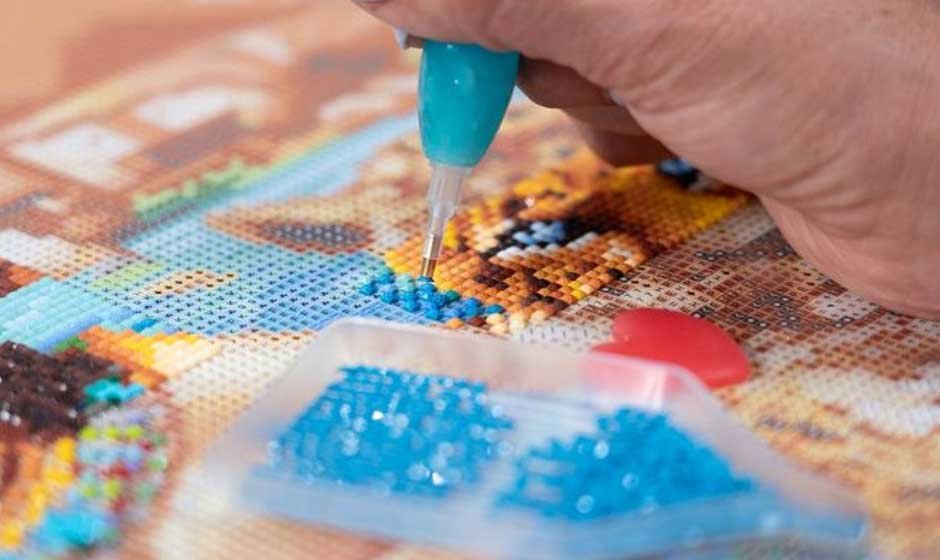
Applying Drills to the Canvas
Start by selecting the correct drill size and shape for your project. Round drills are easier to place, while square drills offer fuller coverage. Use tweezers for precise placement of individual drills. For larger areas, try a multi-placer tool to apply several drills at once.
Gently press each drill onto the canvas to ensure proper adhesion. Work in small sections to maintain focus and accuracy. Use a ruler to keep your lines straight and evenly spaced.
For stubborn drills, blue tac can help pick them up and position them correctly. Always double-check your work to catch any misplaced drills early.
Enhancing Your Crafting Efficiency
Organize your drills by color in small containers or trays. This saves time and reduces confusion during the painting process. Pour out only the colors needed for the current section to avoid mix-ups.
Invest in quality tools like ergonomic applicators and comfortable lighting to reduce strain during long sessions. Take regular breaks to rest your eyes and stretch your hands.
Create a system for tracking your progress, such as covering completed sections or using a checklist. This helps maintain motivation and ensures no areas are missed.
Maintaining Your Diamond Painting for Longevity
Keep your work-in-progress clean by covering unused sections with plastic or parchment paper. This prevents dust and debris from settling on the adhesive surface.
Use a lint roller to gently remove any loose drills or fibers from the finished areas. Be careful not to apply too much pressure, which could dislodge properly placed drills.
Once complete, seal your diamond painting with a clear, non-yellowing fixative spray. This protects the drills and enhances the sparkle. Store finished pieces flat or rolled carefully to prevent warping or drill loss.
Regularly clean your tools and workspace to ensure optimal performance and longevity of your supplies. Replace worn applicator tips to maintain precision in future projects.
Conclusion
Diamond painting offers a rewarding creative outlet for artists of all skill levels. With the right techniques and tools, anyone can create stunning mosaic artworks. Proper preparation, organization, and attention to detail are key to achieving professional-looking results. By following expert tips and practicing consistently, diamond painters can refine their craft and produce flawless, eye-catching pieces to display proudly.