How to Record Your Screen on iPhone?
We’ve all been in a situation where we’ve seen something interesting or important and thought we could capture it and share it later with friends. Screen recording can also help you create quick tutorials on how to use apps, play games, etc. For teachers and content creators, capturing content may be very vital—thus the use of screen recording.
But in 2025, with all those high-tech gadgets on iPhones, many people are lost looking for how they can actually record the screen. Recording your screen with the help of apps like Spynger is truly easy if you own an iPhone. The app comes with amazing features that you will use to manage it and improve on your recording.
Click here to learn how to record your screen on iPhone in just a few simple steps.
Get Started with iPhone’s Built-In Screen Recording
iPhone features the built-in feature called Screen Recording, by means of which you can record your screen activity. It also supports recording of the computer’s screen and capturing images of photos and videos. It’s a pretty straightforward way of capturing your screen activity without downloading a third-party app. However, you’ll miss out on the additional features that come with third-party apps.
Follow these steps to turn on screen recorder iPhone:
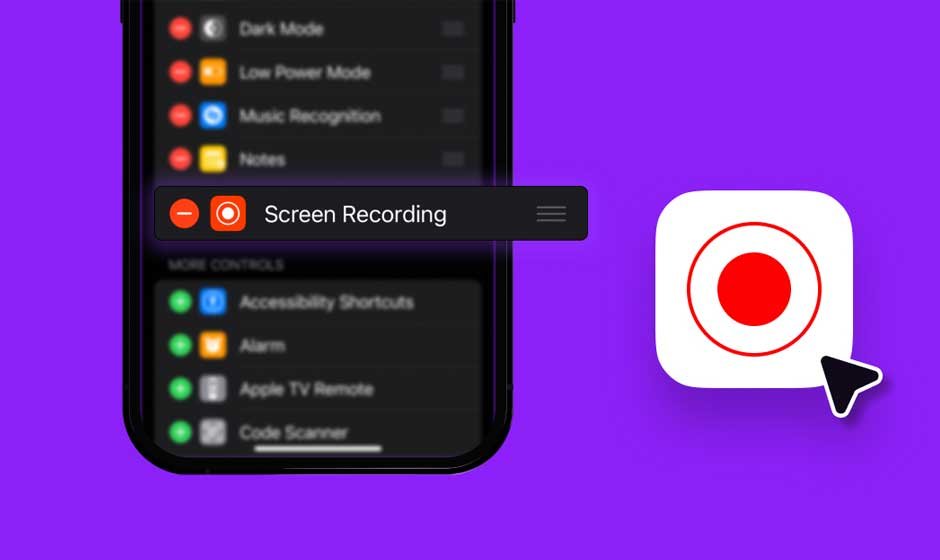
- Open the Control Center by swiping up on iPhone 8 or earlier or swiping down on iPhone X or later.
- From the controls gallery, find the Screen Recordingicon and tap on it. If you can’t see the icon, you can enable it by going to Settings> Control Center > More Controls > Screen Recording. Tap on (+) button next to the Screen Recording to add the icon to your iPhone’s Control Center.
- To record your screen, tap the Screen Recording button. A countdown timer’ll appear on your screen. After 3 seconds – Screen Recording will start capturing your screen activity. A red status bar’ll appear at the top of your screen to indicate screen recording in progress.
Adding Audio to Your Screen Recording
Now that you know how to screen record on iPhone, let’s look at how you can add audio to your screen recordings. These tools allow you to record your screen while talking. Here are the steps you need to follow to turn on your microphone.
- Touch and hold the Recordbutton.
- Tap the microphone icon on the pop-up screen and then tap on Start recording. Wait for the countdown timer to start.
- To exit the Control Centerand close the screen, tap twice.
- The microphone will now be enabled any time you start recording. To turn off the microphone, return to the screen and touch and hold the microphone icon.
In order to ensure better audio quality, it’s best to record in a quiet environment. Choose a space with little to no background noise. Additionally, practice a couple of times and close other apps or tabs to allow the screen recording tool to operate smoothly.
Editing and Trimming your iPhone Screen Recording
iPhones come with impressive built-in tools that allow you to edit and trim your screen recordings. Here are the steps you need to follow to trim your screen recordings on iPhone.
- Find the video you want to trim and open it.
- Tap on the Editbutton.
- A timeline showing thumbnails of the video will appear. An arrow on either end helps you to cut off a section at the beginning of the video.
- Tap on the arrow on your left and drag it until you get to the point where you want your new video to start.
- To cut off the video at the end, repeat the same with the arrow on the right-hand side of your screen.
- Once you’re done, click the Donebutton.
If you have two separate clips, you can stitch them together using iMovie. To do this, launch iMovie, tap on Start New Project, then Movie. Then select the two videos in the correct order and tap Create Movie. Then tap Done.
Spynger app for Advanced Recording & Management
Spynger is an app with advanced screen recording and management capability. Its features enhance your screen recording and video editing experience.
Why Spynger is a valuable add-on?
Such app presents a wide range of benefits for those looking to organize and manage their screen recordings.
- First, the app takes the security of its users seriously. When you record your screen, the app does not store the video or screenshot. Additionally, the app uses the latest security tools, such as SSL encryption, to protect your screen recordings from hackers.
- Secondly, Spynger values your privacy. They do not share or sell your recordings to third parties. It’s one of the best apps you can use without having to worry about your screen recordings being accessed by a third party.
Conclusion
While it’s possible to screen record iPhone and even edit the video using built-in features, Spynger offers a more secure and reliable way to do so. The app comes with a range of features to enhance your screen recording experience. You don’t need to be tech-savvy to use the app. It has one of the most user-friendly interfaces, and setting it up is easy.