Week 3: One-Point, Two-Point, ThreePoint (Bird’s POV and Worms POV), Four-point, Five-point (Fish Eye), Elliptical Perspective and Foreshortening
This week will be an exploration into the different types of perspectives.
Linear perspective (or geometric) can give your drawing a more realistic appeal by creating the illusion that you are actually looking at the subject.
Especially in scenic drawings, your drawings will appear to have more depth and be less flat with the use of linear perspectives.
Perspectives can be difficulty to grasp when first starting and may require a lot of practice.
There are numerous books and guides online that are dedicated JUST to perspective drawing so this is not a stand-alone guide by any means at all.
In this guide, I’ll show you where the best beginner guides are for your reference.
Before we get into any of these perspectives, there’s a few terms that you have to know!
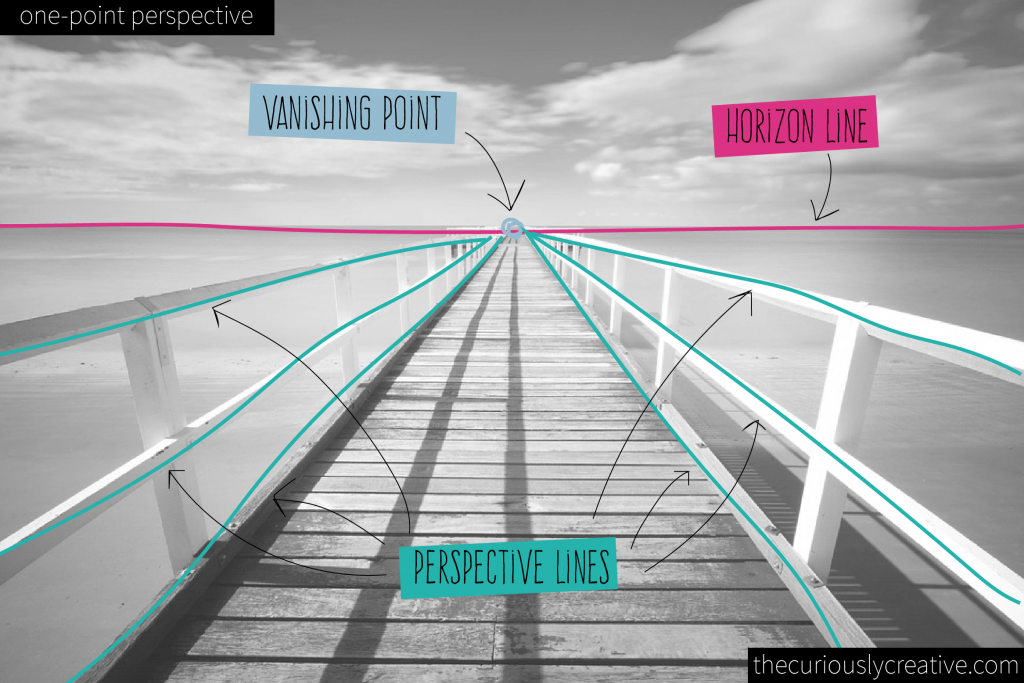
Horizon line
In the photo below of a pier, the horizon line is found in the break between ocean and sky.
Imagining this line in different scenes will allow you to establish your perspective.
In a scene of someone driving down an empty road around empty land, the horizon line will be the break between land and sky.
Vanishing point
This is the point on the horizon line where objects typically converge, or disappear.
Objects become smaller the further they are away and the vanishing point is, well, the point where these things vanish.
In the photo below, the vanishing point is depicted in light blue.
Perspective lines
These are lines that can be drawn from the outside of a picture to the vanishing point.
All lines should converge at the vanishing point and are used to help create guidelines for drawing in other details of the picture.
The railings of the pier are good examples of perspective lines. You can use these lines to guide yourself when drawing in details of the picture.
The name of the type of perspective will refer to the number of vanishing points used in creating a drawing. For example, a one-point perspective drawing has one vanishing point.
The next few weeks will be broken down by a type of perspective each day. However, if you like things quick and dirty like I do… this video from the Rubber Onion explains 1, 2, and 3 point perspective in under 1 minute.
Even better, this article by Mike Thermes compares all 6 perspectives on his website. It’s a good final review for these perspectives.
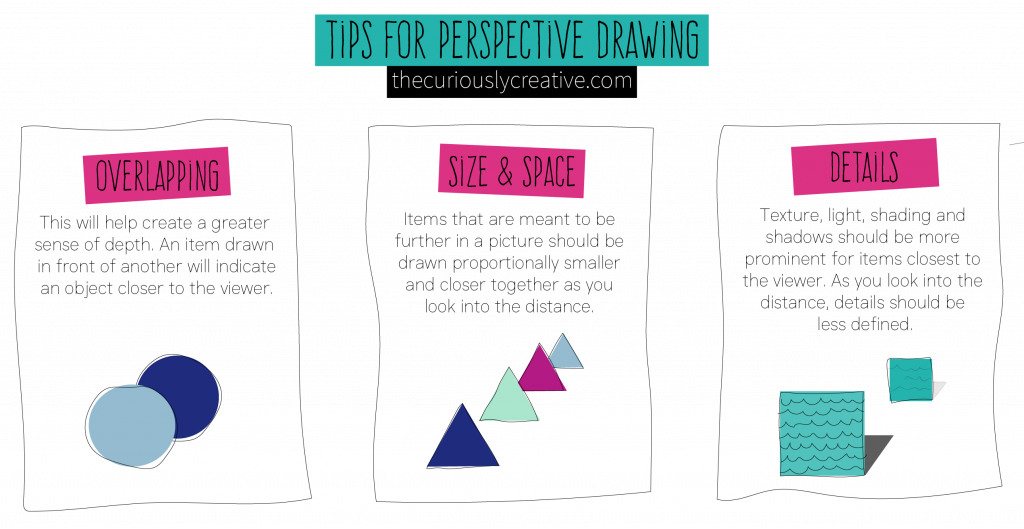
SOME TIPS BEFORE YOU START
Learning how to draw linear perspective by understanding your vanishing points and horizontal lines is extremely important.
However, there’s a few more components that are vital to perspective drawing in order to create a more realistic scene (if that’s your goal).
Some tips to really help your perspective drawing shine are to incorporate the techniques below. Check out some great examples from Bill Martin on this subject as well.
DAY 1: DRAWING ONE-POINT PERSPECTIVE
One-point perspective has one vanishing point on the horizon. The vanishing point does not necessarily need to be in the center.
Student Art Guide has a very comprehensive guide on this perspective that I think is worth spending Day 1 of Week 3.
They go over true shapes, vanishing points and horizon lines while providing multiple YouTube videos and student examples to help you recognize these components of one-point perspective drawings.
It also provides a great worksheet for practice and MULTIPLE exercises just for one-point perspectives. The Virtual Instructor also has a nice, shorter guide.
If you’re more into videos, here’s one by EasyThingsToDraw101 to follow along with while you are drawing.
Exercise
Using one-point perspective, practice drawing an empty road with a vanishing point in the center. Draw your horizon line and pick a vanishing point.
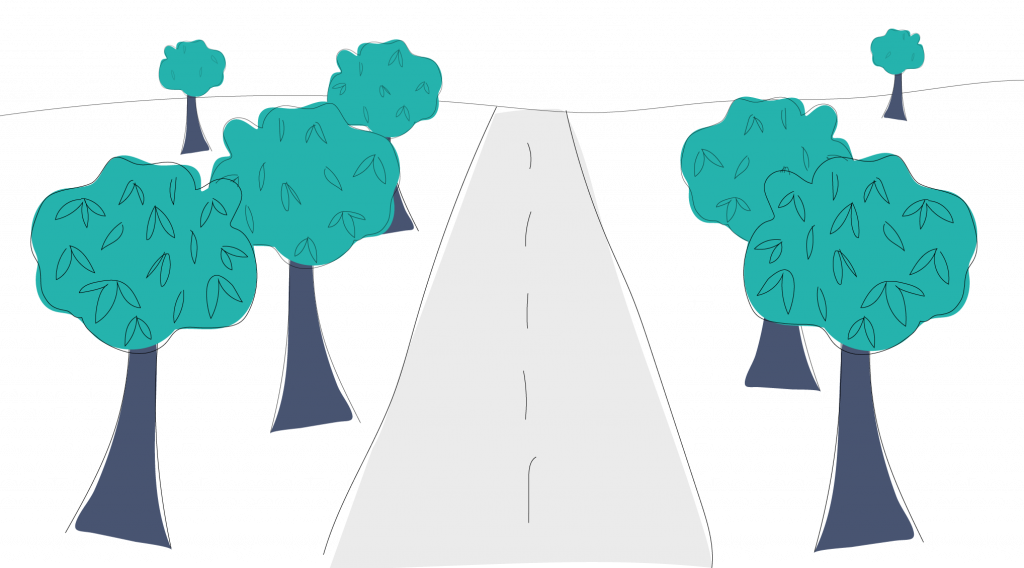
Let’s incorporate the 3 tips on perspective drawing. First one is overlapping.
Tip #1 Draw some trees, but overlap them to create a sense of depth. Don’t worry if you don’t know how to draw trees yet! Just draw simple ones.
Tip #2 is all about sizing and spaces. The trees is closest to the viewer should be the largest, while the ones furthest from the viewer will be proportionally smaller. Draw in perspective lines if you need to help you with the proportions.
Lastly, tip #3 –details! Details are going to be more prominent when it’s closest to the viewer.
On the trees that are closest, draw more pronounced leaves. On the trees that are the furthest, your leaves should be less detailed.
Use lighter values and softer strokes to create this sense of depth in your drawing.
DAY 2: DRAWING TWO-POINT PERSPECTIVE
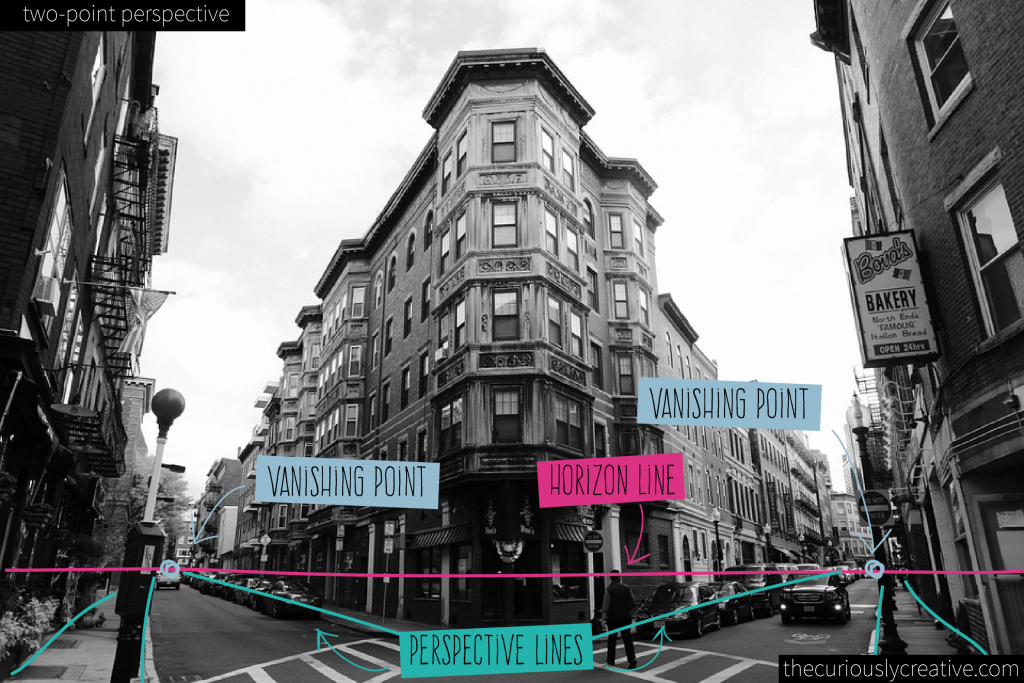
Two-point perspective includes two vanishing points. Think of yourself on a street corner in the middle of city at an intersection.
You are looking across the intersection at a building. If you look down to your left, a long road travels until the horizon.
If you look down at your right, another long road travels until the horizon. There’s your 2 vanishing points.
Both don’t need to be drawn on your paper to give the illusion of a 2-point perspective, it can be assumed that these vanishing points are off the paper.
The Virtual Instructor has another great step-by-step guide on this. I also really like EasyThingsToDraw101’s video on two-point perspective.
Exercise
Using two-point perspective, practice drawing a building from the street corner you pass on a daily basis.
Mine’s a Jack in the Box fast food restaurant. You don’t need to get the building details right.
Just drawing a cube or rectangular prism as the building is good enough for this exercise.
DAY 3: DRAWING THREE-POINT PERSPECTIVE
As you might have guessed, three-point perspective has 3 different vanishing points.
You might have also heard of “Bird’s Eye View” or “Worm’s Eye View” before.
These are also three-point perspectives with the third vanishing point either above or below the horizon line.
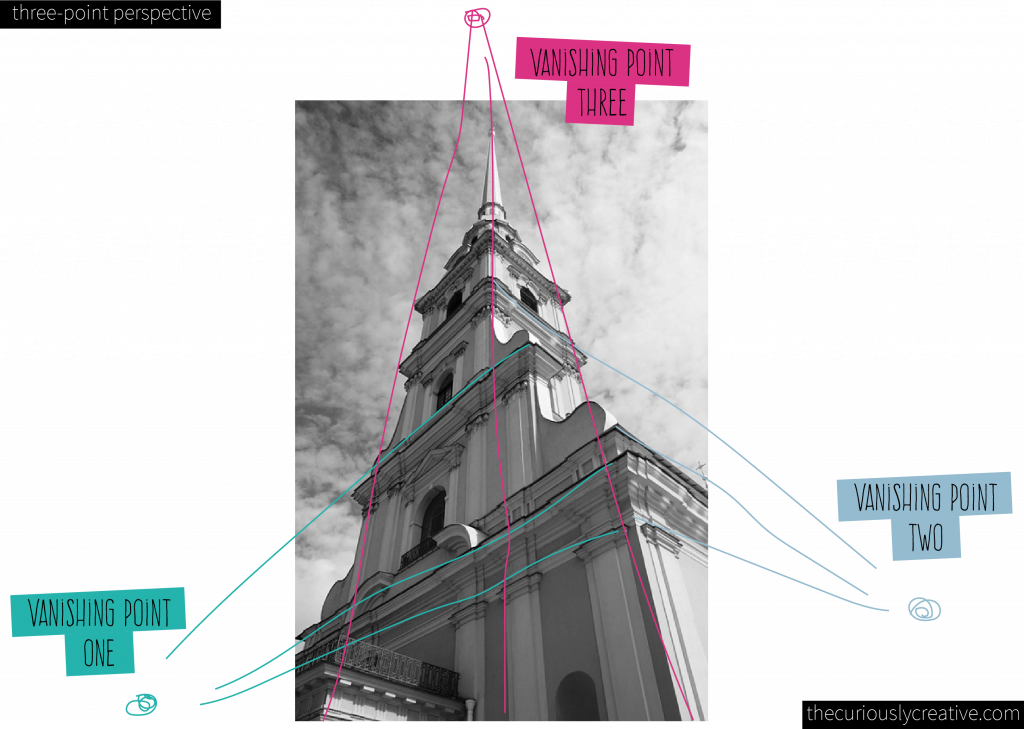
Worm’s Eye View: If the 3rd vanishing point is above the horizon line, you are looking up at something.
Bird’s Eye View: If the 3rd vanishing point is below to the horizon line, you are looking down at something.
I love this step-by-step tutorial from Envato but Spencer Nugent’s video on drawing a building in three-point perspective is also helpful if you like watching to learn.
Exercise
Using worm’s eye view, draw the same building you drew for day 2. I’m bringing back that Jack in the Box except this time, I’m going identify three vanishing points.
I’ll draw a horizon line closer to the bottom of my paper and place 2 vanishing points along this line. My 3rd vanishing point will be anywhere above the vanishing line.
Once I draw my building, it will feel like the view of a dropped taco sauce packet in the parking lot. After you’re done with that, do the same with a bird’s eye view.
DAY 4: DRAWING FOUR- & FIVE-POINT PERSPECTIVE
Four and five points?! Yes, more vanishing points! Once you have the other perspectives down, you can tackle these bad boys. In these perspectives, your perspective lines are no longer straight but curved.
Four-Point Perspective: It’s also known as infinite-point perspective. It’s supposed to be the most accurate depiction of perspective from the human eye.
This is the curvilinear equivalent of a 2-point perspective. Think of your vanishing points being located on the cardinal points of a compass (North on the top, West on the left, South on the bottom, and East on the right).
Dick Termes has a nice 7-minute video that will help you understand the concept of this perspective.
I’m not a big fan of the quality of this video from Jazz It Up but it is a very quick and easy way to understand 4-point perspective.
Many other videos I found were just time lapses on an elaborate, detailed drawing in that particular perspective. Not super helpful for beginners at all.

Five-Point Perspective: This one is known as fish-eye or curvilinear perspective.
You can also think of it as what it would look like if you were looking through a door’s peephole. Your vanishing points will again follow the N, W, S, E marks but with the fifth vanishing point being located in the center of your drawing.
Scott McDaniel can help you visualize this perspective a little better. If you need a video, Jazz It Up also has another one on 5-point perspective. Again, however, I’m not a big fan of the quality but it really gets the concept across.
BONUS! Six-Point Perspective: Yes, I’m not kidding you. Six-point perspectives are utilized when you want to draw on a sphere like the art created by Dick Termes.
Exercise
Follow the Jazz It Up videos to map out both the 4-point perspective and 5-point perspectives.
No need to add any real details to this one. Just practice drawing rectangular prisms (like the video) that fit into your perspective lines.
When you’re done with both, compare the two and notice the differences in how your shapes are depicted.
DAY 5: DRAWING ELLIPTICAL PERSPECTIVE
Elliptical Perspective is not something I see on most beginner guides on drawing.
I came across it while exploring Bill Martin’s Guide to Drawing. This 6-part section really can help you in perspective drawing because ellipses can be how we determine the contours of a surface. It is definite must-read and practice in my eyes.

If the 6-part section is too daunting for you, his 3-minute video on this subject is also helpful. Fair warning though, it feels like a blast from your late 80s past.
Craftsy also provides a step-by-step tutorial on elliptical perspective by using cylinders drawn from rectangular prisms.
Exercise
Let’s go back to your drawing for day 1 on one-point perspectives and add some ellipses. Our ellipses will be in the form of trash cans in this drawing.
I know, not the prettiest thing to draw but I couldn’t think of a more fitting item to add to your road and trees drawing.
You can start either by using the rectangular prism method from Craftsy, or just by using Bill Martin’s tips.
Just remember that in perspective drawing, the bottom curvature of your cylindrical item is going to be a much rounder curve than the top one in order to be portrayed correctly.
DAY 6: FORESHORTENING
Foreshortening is important to understand because it can be necessary when trying to portray depth in your drawing.
Foreshortening creates an optical illusion by drawing a compressed version of that object.
It can distort the viewer’s perspective of the drawing and make them feel like the object is actually coming out of the paper or make them feel like the object is deeper into the paper.
We touched on this technique briefly while exploring some tips in one-point perspective and also in elliptical perspective.
When we first drew our items (trees, trash cans, etc.) on our perspective drawings, we drew them proportional smaller or larger to one another. In foreshortening, you ditch the proportions.
Foreshortening objects will distort them by shortening it. It can be difficult because it doesn’t look exactly like what your brain remembers the object to look like. It’s going to look weird. Don’t worry.
The foreshortening concept is more evident in figure drawing. Since we are diving into that next week, we won’t practice drawing hands or anything. I just want you to understand the concept.
Learn-to-Draw.com has a nice little article that might help you understand this concept more.
Alphonso Dunn also has 23-minute video on foreshortening that can be a bit difficult to listen to (sound quality-wise) but very informative.
DAY 7: PRACTICE!
Perspectives can be a difficult thing to grasp. It can require a bit of practice to get things to look right. Today, we’ll be just about practice. You can also use this day to explore any perspective you feel you are still having trouble with.
Exercise
This exercise is going allow you to get a better grasp on not only perspectives, but on concepts we have covered from day 1.
1) Find 4-5 square/rectangular objects you have around you. Tissue box, cell phone, dice, whatever.
2) Scatter those objects on flat surface in front of you. Place them in varying distances from each other. Maybe two objects side-by-side. Another object a bit further away from the others. Stack one on top of each other. Don’t line them up in the same orientation.
3) View your objects from the top looking down. Draw the objects as flat two-dimensional rectangles/squares and note the distance between each one. The stacked object will be drawn inside the rectangle representing the bottom object.
3) Sit down in front of your items. We’ll now be drawing the three-dimensional representation of these objects by practicing first-point perspective first.
4) On your paper, draw out your horizon line and place your vanishing point in the center. Draw in your perspective lines if necessary. You may need to lower yourself to eye level of the flat surface in order to visualize your objects in this perspective.
5) Draw the objects as you see them in a first-point perspective. Remember the tips you learned this week – focus on shapes and overlapping. You can forego drawing the details in this exercise. Just draw rectangular prisms to represent your objects.
6) Identify the light source for your objects. Where is the light hitting? Where are the shadows being created? Apply different values to your boxes in order to portray the lights and shadows you are seeing.
7) Repeat steps 4 through 6 with a different perspective.
– For a two-point perspective, start with the corner of an object as the center of your drawing.
– For a three-point perspective, use a bird’s eye POV by viewing the objects from a higher point
than where you are sitting.
– For four- or five-point perspectives, draw out your perspective grids to help you start.
8) Move around the objects and try drawing your objects from several different viewpoints.
Awesome, you’ve reached the end of week 3! READY FOR WEEK 4?
OTHER GUIDES:
The Complete Beginner’s Guide to Drawing
The Quick Beginner’s Guide to Drawing Supplies
Week 1: The Beginner’s Guide to Drawing Basics: Part 1
Week 2: The Beginner’s Guide to Drawing Basics: Part 2
Week 4: The Beginner’s Guide to Figure Drawing